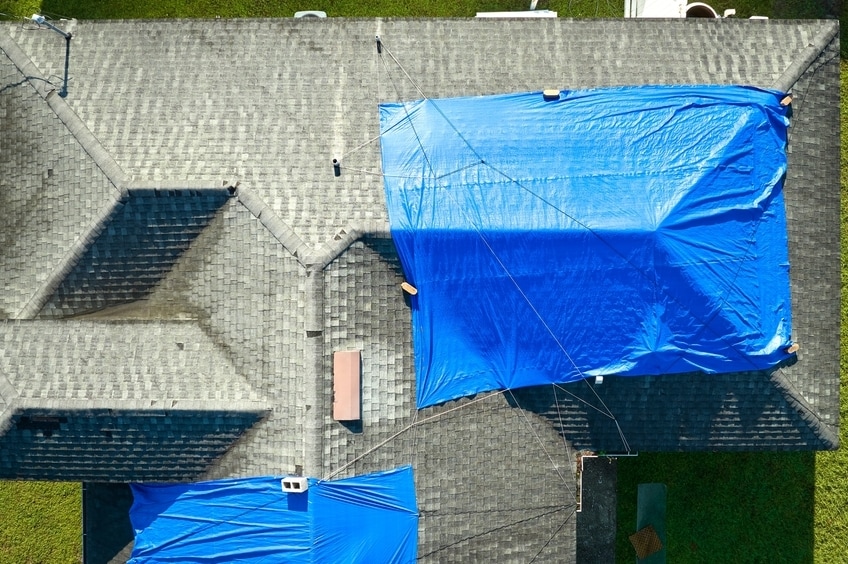


When an intense storm or hurricane damages homes and buildings, roofing companies tend to get booked up fast. If your roof sustains damage and local contractors aren't able to address your needs right away, tarping over the affected area can help protect your home in the meantime.
Roofs with missing or cracked shingles and broken flashing can lead to water leaks and other roof problems without intervention. Although it's a temporary fix, a tarp can help you avoid further damage until a repair or full replacement can be made.
As with other roofing work, tarping a roof needs to be done correctly, so it's best to tap a professional. However, understanding how to do it correctly can help you spot potential mistakes. Here's what to know.
Preparing For Tarping
An important first step in the tarping process is assessing the full extent of the roof damage. This will help identify what areas need to be covered. Portions with broken or missing shingles, damaged flashing, fallen tree branches, structural sagging, or noticeable gaps will need to be covered by a tarp.
You can also look from inside your home and attic to check for strong signs of heavy water leaks or sunlight, which can point toward an opening in the roof. Some roofing contractors even use drones to get an aerial view of the roof and better analyze the damaged areas.
Securing the Proper Tools and Precautions
After surveying the damage, the person making the repair will need to gather all the right tools and sufficient material. The following items are integral to the repair process:
- Closed-toe shoes with a non-slip sole
- Heavy-duty gloves for clearing debris from the roof
- Goggles to protect your eyes
- A sturdy ladder for accessing the roof
- A broom for cleaning debris like branches and broken roofing material
Ensuring Adequate Safety
In addition to gathering the materials listed above, there should be a focus on precautions that can keep everyone on the roof safe and reduce the risk of falls. Keep the following considerations in mind when preparing to install a tarp on a damaged roof:
- It's best to leave this work to the professionals. Experienced roofing contractors often invest in specialized insurance and expensive fall protection systems that can save them in case of a fall.
- If you choose to perform the work yourself, it's wise to enlist the help of one or two others. Tarping a roof is a job for at least two people-but the more hands there are, the faster it can get done.
- Avoid loose or baggy clothing that can get caught on roofing materials or structural components.
- Never try to tarp a roof when it's still raining outside, or the sky isn't clear.
Tarping Techniques
Once you've made preparations and the roof is ready for tarping, these steps can help lead to a successful installation.
Measure Beyond the Damaged Area
Start by measuring the damaged area using a tape measure. This helps determine the correct tarp size, so you don't end up with one that's too small. As a rule of thumb, the tarp should extend past the damaged areas by at least four to five feet. This prevents wind-driven rain from sneaking its way back inside.
Remove Debris from Roof
In the aftermath of hurricanes and storms, there can be all types of debris on top of your roof. Before starting the process of placing a tarp on the damaged area, you'll need to remove tree branches, leaves, loose nails, broken shingles, and anything else that can clog your gutters or further damage the roof.
Someone will need to get on the roof to perform this work, so consider letting a professional handle this task.
Position the Tarp
The next step is to carefully position the tarp on the roof and ensure it's properly weighed down, so it won't loosen or come off. There are many ways that roofers weigh down tarps, such as using sandbags or nailing wooden boards. Wooden boards are the generally preferred method, as they hold the tarp down more securely.
Fasten the Tarp to the Roof
To secure a tarp using wooden boards, wrap the edge of the tarp around a board and use long nails (to connect the materials and secure them to the roof) to ensure it's fully attached. Some roofers might avoid this method since it can cause the tarp to become vulnerable to ripping, but investing in a high-quality, durable tarp can help prevent against it weakening or tearing under stress.
Multiple wooden boards might be needed, depending on the extent of the damage and the size of the tarp. This step requires at least two people to handle the materials, so it should never be attempted alone.
Make Sure It's Watertight
When you lay down the tarp on one end and secure it, lay it down steadily and tight, so there is little space between the tarp and the roof. You don't want a lot of space between the two since water can easily make its way inside. When setting the wooden boards down, install them perpendicular to the roof ridge to prevent snow and rain from accumulating against them.
Common Mistakes To Avoid
There are several mistakes that homeowners or inexperienced contractors might make when tarping a roof.
Choosing a Low-Quality Tarp
If you're going through the process of installing a tarp, ensure that you choose one that's thick enough to rest heavily on the roof and resist all weather elements and heavy impacts. It should also be long enough so that moisture can't easily penetrate the damaged areas of the roof.
Not Properly Securing the Tarp to the Roof
If you attach the tarp to your roof without placing anything to weigh it down, it can easily fly off if the winds are strong enough. Nailing the tarp directly to your roofing shingles without using boards can lead to ripping, and it won't always hold. While it can be tempting to skip these steps to reduce material costs or time, it can cost you a lot more if the tarp comes off.
Leaving the Tarp up for Too Long
When it comes to maintaining the tarp, you shouldn't need to do too much, since you should only have it on your roof for a maximum of three months. If you're not able to schedule a repair or replacement in that time, and the condition of your tarp has deteriorated, you may need to get a new one.
It's worth having a roofer come one month after initial installation to inspect the tarp and confirm it's still securely attached to your roof. They can also look to replace any loose or lost nails. If you're expecting even stronger storms in the future, or have noticed any rips, call a contractor immediately.
Protecting Your Roof and Home with Confidence
Tarping a roof can be a great quick fix after a devastating storm causes damage and area contractors are busy for weeks or months. A tarp can protect your house when you need it the most, but it's important to remember that they are only a temporary solution. Further repairs will be needed in the future.
Again, it's best to seek professional help when it comes to tarping a roof and performing a permanent repair. When you need assistance but aren't sure where to look, consider turning to a GAF-certified contractor* to ensure the work is reliable and completed safely.
*Les entrepreneurs inscrits aux programmes de certification GAF ne sont pas des employés ou des agents de GAF, qui ne contrôle pas et ne supervise pas ces entreprises indépendantes. Les entrepreneurs peuvent recevoir des avantages, tels que des points de fidélité et des remises sur les outils de marketing de GAF pour avoir participé au programme et offert des garanties améliorées GAF, qui exigent l'utilisation d'une quantité minimale de produits de la marque. Your dealings with a Contractor, and any services they provide to you, are subject to the GAF Contractor Terms of Use.

